10 December 2009

Microsoft Dynamics CRM 4 Integration Unleashed

Last month, Pearson(Sams Publishing) sent me a book to review. It's the 《Microsoft Dynamics CRM 4 Integration Unleashed》written by Marc and Rajya.

The book covers many areas that you can think of about the CRM 4 integration: Infrastructure Design; Extending CRM; Silverlight Integration; SharePoint Integration; BI; Digital Phone Integration; Master Data Management; Social Network Integration; Mapping Technologies; CRM 4.0 Accelerators; SCOM; VSTS; BizTalk Integration; Azure; Scribe Integration and more.

I really like the fact that the book provides some real world examples and step by step through integrating Dynamics CRM with other products/technologies, it's helpful for CRM architects and developers to get an overview or even in details about CRM Integration.

28 November 2009

Install SharePoint 2010 on a VM environment

When SharePoint 2010 Beta released couple weeks ago, I tried to install it on a VM: What I got for this VM are: Windows Server 2008 R2, SQL 2008 R2(CTP), 1.5GB RAM, etc.

I selected the "Standalone" install, the installation process took about 15 minutes. When it completed, I ran the Configuration Wizard, it failed on the step 5:
Failed to register SharePoint services.
An exception of type System.ServiceProcess.TimeoutException was thrown. Additional exception information: Time out has expired and the operation has not been completed.
System.ServiceProcess.TimeoutException: Time out has expired and the operation has not been completed.


I Googled it, it seems like the RAM is far not enough(minimum 4GB); I also found that modify registry key doesn't help in my case.

The work around I found: Re-Install SharePoint 2010 by using "Server Farm" >> "Complete" option, then both installation and configuration went successful! That's good enough for me to test things. ;-)

24 October 2009

Change the lookup view on Many-to-Many relationship

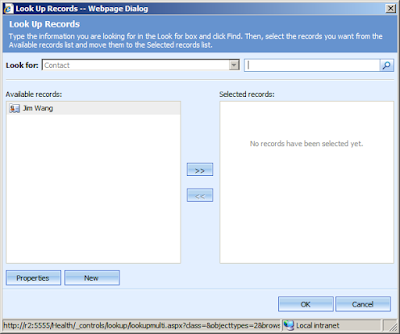
The N:N lookup view in CRM 4.0 is very basic: it only shows the primary field on the lookup entity. Say if you create a N:N relationship for Account and Contact, the lookup view looks like:


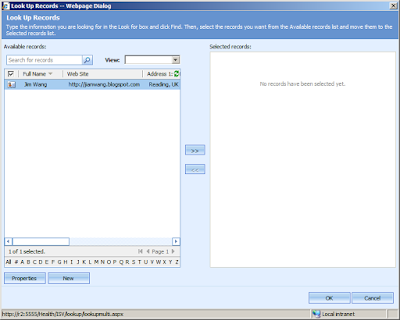
It's not convenient if you want to see more details of the lookup records. So, how can we change it?
How about if we put the standard view(Active Contacts View, Contact Lookup View, etc) on the left panel - Sounds great!

The solution includes two parts:
1. A customized lookupmulti.aspx in the ISV folder;
- Used for generating the lookup view.
2. Jscript code on the referencing entity(which is 'Account' in this case )
- Used for passing parameters to the custom ASPX page;


First of all, create a new folder under the: \CRMWeb\ISV\
Save the below code as a ASPX file in that folder, so you got, for instance: \CRMWeb\ISV\lookup\lookupmulti.aspx


<!--
-- Show entity's standard View in a N:N LookupMulti dialog window.
-- Jim Wang @ October 2009
-- http://jianwang.blogspot.com
-- http://www.mscrm.cn
-->
<html><head><META HTTP-EQUIV="Content-Type" CONTENT="text/html; CHARSET=utf-8">
<title>Look Up Records</title>
<script type="text/javascript">
var viewDoc = this;
var _mode = 4;
var IS_PATHBASEDURLS = true;
var ORG_UNIQUE_NAME = window.dialogArguments.split("/")[1];
var iTypeCode = window.dialogArguments.substring(window.dialogArguments.indexOf("etc=") + 4, window.dialogArguments.indexOf("&viewid="));
</script>
<script type="text/javascript" src="/_static/_common/scripts/encodedecode.js"></script>
<script type="text/javascript" src="/_static/_controls/util/util.js"></script>
<script type="text/javascript" src="/_static/_common/scripts/global.js"></script>
<script type="text/javascript" src="/_static/_common/scripts/xmlutil.js"></script>
<script type="text/javascript" src="/_static/_controls/remotecommands/remotecommand.js"></script>
<script type="text/javascript" src="/_common/windowinformation/windowinformation.aspx"></script>
<script type="text/javascript" src="/_static/_controls/lookup/lookupdialogs.js"></script>
<script type="text/javascript" src="/_static/_forms/addrelated.js"></script>
<script type="text/javascript" src="/_static/_common/scripts/details.js"></script>
<script type="text/javascript" src="/_static/_common/scripts/select.js"></script>
<script type="text/javascript" src="/_static/_common/scripts/presence.js"></script>
<script type="text/javascript" src="/_static/_controls/number/number.js"></script>
<script type="text/javascript" src="/_static/_controls/lookup/lookup.js"></script>
<link rel="stylesheet" type="text/css" href="/_common/styles/global.css.aspx?lcid=1033" />
<link rel="stylesheet" type="text/css" href="/_common/styles/global-styles.css.aspx?lcid=1033" />
<link rel="stylesheet" type="text/css" href="/_common/styles/global-dynamic-styles.css.aspx?lcid=1033" />
<link rel="stylesheet" type="text/css" href="/_common/styles/fonts.aspx?lcid=1033" />
<link rel="stylesheet" type="text/css" href="/_forms/controls/form.css.aspx?lcid=1033" />
<link rel="stylesheet" type="text/css" href="/_forms/controls/controls.css.aspx?lcid=1033" />
<link rel="stylesheet" type="text/css" href="/_common/styles/dialogs.css.aspx?lcid=1033" />
<link rel="stylesheet" type="text/css" href="/_controls/lookup/lookupdialogs.css.aspx?lcid=1033" />
<link rel="stylesheet" type="text/css" href="/_common/styles/select.css.aspx?lcid=1033" />
<link rel="stylesheet" type="text/css" href="/_controls/notifications/notifications.css.aspx?lcid=1033" />
</head><body><div style="width:100%; height:100%; overflow:auto"><table style="width:100%; height:100%;" cellspacing="0" cellpadding="0"><tr><td colspan="2" class="ms-crm-Dialog-Header">
<div class="ms-crm-Dialog-Header-Title" id="DlgHdTitle">Look Up Records</div><div class="ms-crm-Dialog-Header-Desc" id="DlgHdDesc">Type the information you are looking for in the Look for box and click Find. Then, select the records you want from the Available records list and move them to the Selected records list.</div></td></tr>
<tr><td colspan="2" style="height:100%;"><div class="ms-crm-Dialog-Main" ><div id="divWarning" style="height:100%;">
<script language="JavaScript">

function initFrame() {
viewDoc = document.getElementById("frmResults").contentWindow.document;
tblResults = viewDoc.getElementById("crmGrid").InnerGrid;
if (tblResults == undefined) {
return;
}
}

function createNew() {
openObj(iTypeCode, null, null);
}

function applychanges() {
window.returnValue = buildReturnValue(tblSelected.rows);
window.close();
}

function cancel() {
window.close();
}

function window.onload() {
if (window.dialogArguments) {
document.getElementById("frmResults").src = window.dialogArguments;
document.getElementById("frmResults").onreadystatechange = resultsReady;
}
else {
alert("No arguments found.");
return;
}
}

function resultsReady() {
if (frmResults.document.readyState == "complete") {
initFrame();
viewDoc.body.scroll = "no";
viewDoc.body.style.padding = "0px";
viewDoc.body.style.border = "1px";
viewDoc.body.firstChild.firstChild.firstChild.firstChild.bgColor = "#E3EFFF";
viewDoc.getElementById("crmMenuBar").parentNode.parentNode.removeNode(true);
viewDoc.getElementById("crmGrid").onpropertychange = function() { setTimeout(onAfterChange, 100); }

setNavigationState();
}
}

function onAfterChange() {
initFrame();
setNavigationState();
}

function removeSelected() {
var items = tblSelected.selectedItems;
for (var i = 0; i < items.length; i++) {
items[i].removeNode(true)
}

items.splice(0, items.length);
if (tblSelected.rows.length > 0) {
selectItem(tblSelected, tblSelected.rows[0], true);
}
setNavigationState();
}

function duplicateSelection(oid) {
var len = tblSelected.rows.length;
for (var i = 0; i < len; i++) {
if (tblSelected.rows[i].oid == oid) {
return true;
}
}
return false;
}

function appendItem(id, type, html, originalItem) {
var tr = tblSelected.insertRow();
tr.oid = id;
tr.otype = type;
tr.originalItem = originalItem;

var td = tr.insertCell();
td.className = "sel";
td.noWrap = true;
td.innerHTML = html;

if (tr.rowIndex == 0) {
selectItem(tblSelected, tr, false);
}
}

function appendSelected() {
initFrame();
var items = tblResults.SelectedRecords;
if (items) {
var len = items.length;
var html = "<TD class=ms-crm-List-DataCell align=middle><IMG style='CURSOR: hand' alt='Click to preview' src='/_imgs/grid/row_selected.gif'> </TD>";

for (var i = 0; i < len; i++) {
var o = items[i];

if (!duplicateSelection(o[0])) {

appendItem(o[0], o[1], o[3].innerHTML.indexOf("row_selected.gif") == -1 ? html + o[3].innerHTML : o[3].innerHTML, null);
}
}
setNavigationState();
}
}

function setNavigationState() {
if (tblResults != undefined) {
if (tblResults.SelectedRecords != null && tblResults.SelectedRecords.length != null && tblResults.SelectedRecords.length > 0) {
btnProperties.disabled = false;
btnAppend.disabled = false;
}
else {
btnProperties.disabled = true;
btnAppend.disabled = true;
}
btnRemove.disabled = (tblSelected.rows.length == 0);
tblNoRecords.runtimeStyle.display = (tblSelected.rows.length == 0 ? "" : "none");
}
}

function showProperties() {
initFrame();
var items = tblResults.SelectedRecords;
if (items == null || items.length == null) {
return;
}
if (items.length == 0) {

alert("You must select one object.");
}
else if (items.length > 1) {
alert("You must only select one object.");
}
else {
var nWidth = 560;
var nHeight = 525;
var oWindowInfo = GetWindowInformation(items[0][1]);
if (oWindowInfo != null) {
nWidth = oWindowInfo.Width;
nHeight = oWindowInfo.Height;
}

switch (Number(items[0][1])) {
case Service:
openStdWin(prependOrgName("/sm/services/readonly.aspx?objTypeCode=" + items[0][1] + "&id=" + items[0][0]), "readonly" + buildWinName(items[0][0]), nWidth, nHeight);
break;
case Workflow:
openObj(items[0][1], items[0][0]);
break;
case ImportMap:
openStdWin(prependOrgName("/tools/managemaps/readonly.aspx?objTypeCode=" + items[0][1] + "&id=" + items[0][0]), "readonly" + buildWinName(items[0][0]), nWidth, nHeight);
break;
default:
openStdWin(prependOrgName("/_forms/readonly/readonly.aspx?objTypeCode=" + items[0][1] + "&id=" + items[0][0]), "readonly" + buildWinName(items[0][0]), nWidth, nHeight);
break;
}
}
}

</script>

<table cellspacing="0" cellpadding="0" width="100%" height="100%">
<td>
<table height="100%" width="100%" id="tblFind" cellpadding="0" cellspacing="0">
<tr height="20">
<td>Available records:</td>
<td></td>
<td>Selected records:</td>
</tr>
<tr>
<td width="45%">

<iframe scrolling="no" class="ms-crm-Dialog-Lookup-Results" id="frmResults" ></iframe>

</td>
<td width="60" align="center">
<button id="btnAppend"disabled="disabled" style="width: 40px;" onclick="appendSelected()" title="Add the selected record">>></button>
<p>
<button id="btnRemove" disabled="disabled" style="width: 40px;" onclick="removeSelected();" title="Remove the selected record"><<</button>
</td>
<td>
<div id="rtnObjList" class="ms-crm-Dialog-Lookup-Objects" onkeydown="listKeyDown(tblSelected)" onfocusin="focusSelectedItems(tblSelected, true);" onfocusout="focusSelectedItems(tblSelected, false);">

<table hidefocus="true" tabindex="0" id="tblSelected" cellpadding="2" cellspacing="0" width="100%" onclick="clickItem( this )" ondblclick="removeSelected()"></table>

<table class="ms-crm-Dialog-Lookup-InlineMsg" id="tblNoRecords">
<tr>
<td class="ms-crm-Dialog-Lookup-InlineMsg" align="center">No records have been selected yet.</td>
</tr>
</table>
</div>
</td>
</tr>
<tr height="20" style="padding-top: 10px;">
<td colspan="3" nowrap>
<button id="btnProperties" disabled="disabled" onclick="showProperties();" class="ms-crm-Button" Title="View the selected record's properties" >Properties</button><span style="width: 5px;"></span>
<button id="btnNew" onclick="createNew();" class="ms-crm-Button" Title="Create a new record">New</button>
</td>
</tr>
</table>
</td>
</tr>
</table>
</div></div>
<div id='divFillBg' style='display:none;position:absolute;top:80px;left:20px;height:23px;width:355px;background-color:#ffffff;'> </div>
<div id='divFill' style='display:none;position:absolute;top:80px;left:20px;height:23px;width:0px;filter: progid:DXImageTransform.Microsoft.Gradient(GradientType=0, StartColorStr=#00ff00, EndColorStr=#00cc00);'> </div>
<div id='divStatus' style='display:none;position:absolute;top:80px;left:19px;height:23px;width:357px;'><img alt='' src='/_imgs/statusbar.gif' height='23' width='357'></div></td></tr><tr><td class="ms-crm-Dialog-Footer ms-crm-Dialog-Footer-Left"> </td>
<td class="ms-crm-Dialog-Footer ms-crm-Dialog-Footer-Right"><button id="butBegin" onclick="applychanges();" class="ms-crm-Button">OK</button> <button id="cmdDialogCancel" onclick="cancel();" class="ms-crm-Button">Cancel</button></td></tr></table></div>

</body>
</html>


Put the below code into Account.Onload(), you need to replace the: nnId, lookupTypeCode, lookupViewId to yours.


var nnId = "new_account_contact"; // entity N:N relationship id
var lookupTypeCode = 2; // entity type code
var lookupViewId = "A2D479C5-53E3-4C69-ADDD-802327E67A0D"; // the view id of referenced entity

var lookupSrc = "/" + ORG_UNIQUE_NAME + "/ISV/lookup/lookupmulti.aspx";
var lookupArg = "/" + ORG_UNIQUE_NAME + "/_root/homepage.aspx?etc=" + lookupTypeCode +"&viewid=" + lookupViewId;

var lookupEntityTypeCode;
var navId = document.getElementById("nav" + nnId);
if (navId != null)
{
var la = navId.onclick.toString();
la = la.substring(la.indexOf("loadArea"), la.indexOf(";"));

navId.onclick = function()
{
eval(la);

var areaId = document.getElementById("area" + nnId + "Frame");
if(areaId != null)
{
areaId.onreadystatechange = function()
{
if (areaId.readyState == "complete")
{
var frame = frames[window.event.srcElement.id];
var li = frame.document.getElementsByTagName("li");

for (var i = 0; i < li.length; i++)
{
var action = li[i].getAttribute("action");
if(action != null && action.indexOf(relId) > 1)
{
lookupEntityTypeCode = action.substring(action.indexOf("\(")+1, action.indexOf(","));
li[i].onclick = CustomLookup;
break;
}
}
}
}
}
}
}

function CustomLookup()
{
var lookupItems = window.showModalDialog(lookupSrc, lookupArg, "dialogWidth:800px; dialogHeight:600px;");

if (lookupItems) // This is the CRM internal JS funciton on \_static\_grid\action.js
{
if ( lookupItems.items.length > 0 )
{
AssociateObjects( crmFormSubmit.crmFormSubmitObjectType.value, crmFormSubmit.crmFormSubmitId.value, lookupEntityTypeCode, lookupItems, true, null, nnId);
}
}
}


Notice:

12 September 2009

CRM ISV Add-On : The entry 'ScriptModule' has already been added

I tested a CRM 4.0 add-on (ISV-A) last week, the default ASPX page generated an error:

Parser Error Message: The entry 'ScriptModule' has already been added.
<add name="ScriptModule" type="System.Web.Handlers.ScriptModule, System.Web.Extensions, Version=3.5.0.0, Culture=neutral, PublicKeyToken=31BF3856AD364E35">
</httpmodules>
</SYSTEM.WEB>


The add-on was located under the folder: CRMWeb\ISV\MyAddon
Of cause it inherits settings from CRM's root web.config: in which the ScriptModule has been added by another ISV's (ISV-B) add-on(it shouldn't do it at all).

But if I remove the ScriptModule from ISV-A's web.config, the error changed to:

Unable to cast object of type 'System.Web.Configuration.ScriptingAuthenticationServiceSection' to type 'System.Web.Configuration.ScriptingAuthenticationServiceSection'.

That's because the .Net version of ScriptModule are different between ISV-A and ISV-B's, so we have to stop ScriptModule(ISV-A's) inheriting from CRM's root web.config.

So that what I need to do on ISV-A's web.config:

Just before the ScriptModule, add a <remove> tag, which will remove the inherited setting:

<remove name="ScriptModule">
<add name="ScriptModule" type="System.Web.Handlers.ScriptModule, System.Web.Extensions, Version=3.5.0.0, Culture=neutral, PublicKeyToken=31BF3856AD364E35">

15 August 2009

Build a handy Dynamics CRM development environment

Last month, Sonoma Partners and Microsoft had an very useful article for CRM developers: Setting Up Your Development Environment, I have abstract it into Chinese version. In this post, I'd like to give my idea about how to build up a handy Dynamics CRM development environment.

The typical situation is: A CRM developer runs a Virtual PC image on his/her own PC; the virtual image is a All-In-One CRM system(Windows Server/SQL/IIS/CRM/SharePoint etc.); the Host PC has Visual Studio installed. I'm not going to discuss the mutli-developers sharing one development environment using TFS in this article.

Setup Virtual PC environment:
Microsoft Virtual PC is a free software, it has all we need to host a development environment. You may firstly install Windows Server 2003/2008 on the VPC, then install AD, DNS, IIS 6/7, SQL server 2005/2008, CRM 4, etc. Finally it's a All-In-One CRM box, I'd like to point out that:

1. It can be a Domain Controller - that's for your development only, not for production.

2. You may need 3 Network Adapters in the VPC:
a. Local only - for VPC internal use
b. Microsoft Loopback Adapter - for the communication between Host and VPC
c. Host's Physical Adapter - for the Internet access via the Host PC

The communication between Host and VPC can be used by a Physical Adapter, however think about this situation:
You have a laptop which can be used at home(via Wireless) and company(via Cable), so the IP arrange / Adapter are different.
That's the reason why we need a Microsoft Loopback Adapter in this "handy" environment(BING it: how to set up a Microsoft Loopback Adapter).

3. The VPC can be set up to the On-Premise/IFD mode, so you can develop/test both CRM deployment. You may edit Host's hosts file(e.g.: C:\WINDOWS\system32\drivers\etc\hosts) to point to the IFD URL.


Setup Visual Studio on the Host PC:
You can use Visual Studio to develop/debug CRM on the Host PC, to make it work efficiently:

1. Add user credentials to access VPC (on your Host PC(I suppose it's a Windows XP system, Vista/7 are similar), go to: Control Panel>>User Accounts>>Advanced>>Manage Passwords) , then type in VPC's Server name, User name and Password, click OK to save it.


2. To make the Remote Debug work, the runas account for Visual Studio on the Host PC and the runas account for the Visual Studio Remote Debugging Monitor(msvsmon.exe) on the VPC must use the same user name, it doesn't matter whether users are in two different domains. For example, your VPC domain name call: WIN2K3, your logon user for the VPC is Administrator; However your Host PC's logon user is: CompanyDomain\jimwang, in this case, the remote debugging will not work because it's on different users names. What you can do is, use the local Administrator account on your Host PC to run Visual Studio. E.g.: you can simply create a shortcut on your desktop, target to, e.g.: %windir%\system32\RUNAS.exe /USER:HostPCName\Administrator "C:\Program Files\Microsoft Visual Studio 9.0\Common7\IDE\devenv.exe" . These two users must have the same password as well.

3. How to remote debug VPC CRM from the Host PC?
Once you completed the step1 and step2, then make sure the msvsmon.exe is running on the VPC( you can copy the file from your Host PC: C:\Program Files\Microsoft Visual Studio 9.0\Common7\IDE\Remote Debugger\x86\), the monitor will then waiting for new connections. Go back to your Host PC, set a Breakpoint in your project,
Then click "Debug">>"Attach to process...", in the Qualifier, type in the VPC's server information you created on step 1, e.g.: WIN2K3\Administrator@R2
And then attach w3wp.exe (Managed code).


4. How to deploy the plugins .dll file to VPC?
You need to deploy the .dll file to the VPC's file system in order to Remote Debug(see SDK for more information), the folder is, e.g.: C:\Program Files\Microsoft Dynamics CRM\Server\bin\assembly\
You may share the folder and give permission to everyone with full control, then in the Visual Studio, set up the project output path to the shared folder, e.g.: \\R2\assembly\
Now, you may have the experience that, every time you deploy/debug the project, you have to run a IISRESET on the VPC to release the previous .dll file.
I write a Windows PowerShell script to help you do the hard work, your may save it as RecycleCRMAppPool.ps1, then in Visual Studio, make it as the Pre-build event command line of the project. The script will recycle the CRMAppPool before deploy the .dll file.


$server="R2";

$co = new-object System.Management.ConnectionOptions;
$co.Authentication=[System.Management.AuthenticationLevel]::PacketPrivacy;
$co.EnablePrivileges=$true;

$wmi = [WmiSearcher] "Select * From IIsApplicationPool";
$wmi.Scope.Path = "\\$server\root\microsoftiisv2";
$wmi.Scope.Options=$co;

foreach($crmpool in $wmi.Get())
{
if($crmpool.name -eq "W3SVC/AppPools/CRMAppPool")
{
$crmpool.recycle();
}
}


5. You may also use Microsoft Dynamics CRM Develop Toolkit Visual Studio add-on to develop any plugin/workflow assembly/jscript for your CRM project, it will reduce your development time.

04 August 2009

CRM Filtered Lookup Multi

I had some posts last year about the CRM Filtered Lookup, these technique are broadly used in the CRM community.

The mysterious CRM Lookup (I)
The mysterious CRM Lookup (II)
The mysterious CRM Lookup (III)

A few days ago, I saw a post on the Microsoft Dynamics CRM Chinese Forum about how to add filter to LookupMulti.aspx ?
I think it's a very common requirements, so I'd like to give my idea.
When I start with this customization, my bottom line was: Not change any files/databases. However this customization should be marked as a "unsupported customization" (call CRM/JS function directly).


OK, the question was:
A customized entity: ShippingMark (new_shippingmark), it has N:1 relationship with Account; it also has N:N relationship with Quote.
And as we known by default, Quote has N:1 relationship with Account(via customerid)

So the relationship is simple: Account -< (customerid)Quote >< ShippingMark(new_accountid) >- Account

What the user wants was classic: Open a Quote record, then go to Add Existing ShippingMark, then in the LookupMulti page, only return the ShippingMark which has the same Account(new_account) with Quote's(customerid).

There are two parts of the code: server side Plugin.Execute event and client side CRM.Onload event. What the client side code does is: create a custom lookup window, and pass the customerid as a parameter, so the lookup URL looks like: …&id=…, then the server side plugin will replace the FilterXml query string based on the parameter.

I give the code prototype for this specific requirement, you need to modify it for re-use. This technique should work for both LookupSingle.aspx and LookupMulti.aspx.


1. Plug-Ins
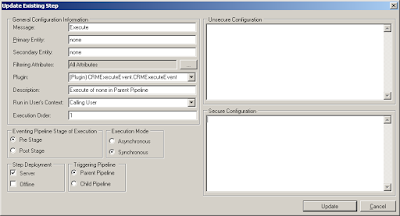
Register the Execute message on the Pre Stage/Synchronous/Server/Parent Pipeline.


/*
* Microsoft Dynamics CRM Lookup Filter
* Plug-Ins: Execute message on the Pre Stage/Synchronous/Server/Parent Pipeline.
* Jim Wang @ Aug 2009, http://jianwang.blogspot.com, http://mscrm.cn
*
*/

using System;
using System.Collections.Generic;
using System.Linq;
using System.Text;
using System.IO;
using System.Web;
using Microsoft.Crm.Sdk;

namespace CRMExecuteEvent
{
public class CRMExecuteEvent : IPlugin
{
string lookupId;

public void Execute(IPluginExecutionContext context)
{

lookupId = HttpContext.Current.Request.QueryString["id"] == null ? null : HttpContext.Current.Request.QueryString["id"].ToString();

if (lookupId == null) return;

try
{
if (context.InputParameters.Contains("FetchXml"))
{
string beforeXml = (String)context.InputParameters["FetchXml"];

if (beforeXml.Contains("<entity name=\"new_shippingmark\">") && beforeXml.Contains("xml-platform"))
{
//Customise the FetchXml query string
string afterXml =
"<fetch version='1.0' page='1' count='100' output-format='xml-platform' mapping='logical'> " +
"<entity name='new_shippingmark'> " +
"<attribute name='new_shippingmarkid' /> " +
"<attribute name='new_name' /> " +
"<attribute name='createdon' /> " +
"<order attribute='new_name' /> " +
"<link-entity name='quote' to='new_accountid' from='customerid'> " +
"<filter type='and'> " +
"<condition attribute = 'customerid' operator='eq' value='" + lookupId + "'/> " +
"</filter> " +
"</link-entity> " +
"<filter type='and'> " +
"<condition attribute='statecode' operator='eq' value='0' /> " +
"<condition attribute='new_name' operator='like' value='%' /> " +
"</filter> " +
"</entity> " +
"</fetch>";

//Replace the FetchXml query string
context.InputParameters["FetchXml"] = beforeXml.Replace(beforeXml, afterXml);

}
}
}

catch (System.Web.Services.Protocols.SoapException ex)
{
throw new InvalidPluginExecutionException("An error occurred in the CRM plug-in.", ex);
}
}

}
}


2. Quote.OnLoad()


var relId = "new_new_shippingmark_quote";
var lookupId = crmForm.all.customerid;

var lookupEntityTypeCode;
var navId = document.getElementById("nav" + relId);
if (navId != null)
{
var la = navId.onclick.toString();
la = la.substring(la.indexOf("loadArea"), la.indexOf(";"));

navId.onclick = function()
{
eval(la);

var areaId = document.getElementById("area" + relId + "Frame");
if(areaId != null)
{
areaId.onreadystatechange = function()
{
if (areaId.readyState == "complete")
{
var frame = frames[window.event.srcElement.id];
var li = frame.document.getElementsByTagName("li");

for (var i = 0; i < li.length; i++)
{
var action = li[i].getAttribute("action");
if(action != null && action.indexOf(relId) > 1)
{
lookupEntityTypeCode = action.substring(action.indexOf("\(")+1, action.indexOf(","));
li[i].onclick = CustomLookup;
break;
}
}
}
}
}
}
}

function CustomLookup()
{
var lookupSrc = "/" + ORG_UNIQUE_NAME + "/_controls/lookup/lookupmulti.aspx?class=&objecttypes=" + lookupEntityTypeCode + "&browse=0";
if(lookupId != null && lookupId.DataValue != null && lookupId.DataValue[0] != null)
{
lookupSrc = lookupSrc + "&id=" + lookupId.DataValue[0].id;
}

var lookupItems = window.showModalDialog(lookupSrc, null);
if (lookupItems) // This is the CRM internal JS funciton on \_static\_grid\action.js
{
if ( lookupItems.items.length > 0 )
{
AssociateObjects( crmFormSubmit.crmFormSubmitObjectType.value, crmFormSubmit.crmFormSubmitId.value, lookupEntityTypeCode, lookupItems, true, null, relId);
}
}
}

29 July 2009

CRM 4.0 : Field Level Security on Print form

CRM 4.0 doesn't provide a true field level security, e.g.: If developers hide attributes/tabs for certain users using crmForm.all.filed.style.display = "none"; These users can still see the field if they Print the record(CRM print preview). I have submitted a feedback to Microsoft about it.

There are no supported way to achieve that, this workaround is not supported and it's not the true field level security!

The file you need to modify is: \CRMWeb\_forms\print\print.aspx
Add the following code just before the 〈/html〉 tag.


<!--
Field level security on Print form
author: Jim Wang @ July 2009
http://jianwang.blogspot.com
-->

<script language="javascript">
var printFrame = document.getElementById("printMain");
var printWindow = document.frames["printMain"];
printFrame.onreadystatechange = function()
{
if(window.opener && printWindow.document.readyState == "complete")
{
//hide attributes
var allFields = opener.document.getElementsByTagName("TD");
for (var i = 0; i < allFields.length; i++)
{
var thisField = allFields[i];
if (thisField.style.display == "none")
{
printWindow.document.getElementById(thisField.id).style.display = "none";
}
}

//hide tabs
var printTabs = printWindow.document.getElementsByTagName("DIV");
var openerTabs = opener.document.getElementsByTagName("LI");
for (var i = 0; i < openerTabs.length; i++)
{
var openerTab = openerTabs[i];
if (openerTab.className && openerTab.className == "ms-crm-Tab")
{
if(opener.document.getElementById(openerTab.id).style.display == "none")
var printTab = printTabs[openerTab.id.replace("tab","").replace("Tab","")];
printTab.style.display = "none";
}
}

}
}
</script>


06 May 2009

CRM 4.0 IFrame: Show Advanced Find Result View

There are many people asked about: How to show the Advanced Find result view in an IFrame? Instead of building a custom aspx page(dynamically passing parameters, see Adi's solution), I have another method to share if you don't need passing parameters into the query.

1. Build your Advanced Find query and save it, then copy the Shortcut.


2. Put a IFrame control on the Form, clear the "Restrict cross-frame scripting" checkbox.


3. Put the below code to the OnLoad() event, you need to change the IFRAME_view name and the iFrame.src (copy and paste from the step 1)


var iFrame = crmForm.all.IFRAME_view;

iFrame.src = SERVER_URL + "/advancedfind/advfind.aspx?etn=contact&QueryId=%7b3882F0FA-2B3A-DE11-BFB8-0018FE7F3A64%7d&ViewType=4230&AutoRun=True";
iFrame.attachEvent( "onreadystatechange" , Ready);

function Ready()
{
var iDoc = iFrame.contentWindow.document;
if(iDoc.getElementById("crmMenuBar") != null && iDoc.getElementById("btnBack") != null)
{
iDoc.getElementById("crmMenuBar").style.display = "none"; // hide the top menu bar
iDoc.getElementById("btnBack").style.display = "none"; // hide the bottom BACK button
}
}


CRM 4.0 IFrame: Show Entity's Associated View

It's a common requirement to show entity's associated view(1:N, N:N) in IFrame, the below code works for both 1:N and N:N relationship, it also works on both On-Premise and IFD deployment. All you need to do is find out(IE Developer Toolbar) the ID of the associated link.

The 1:N relationship needs these parameters in the request URL: oId, oType, security, tabSet
The N:N relationship needs an extra parameter: roleOrd in the request URL, which has been involved in the code.


var navId = "nav_new_new_myentity_account";

if(document.getElementById(navId) != null)
{
var tmp = document.getElementById(navId).onclick.toString();
tmp = tmp.substring(tmp.indexOf("'")+1, tmp.indexOf(";"));
var loadArea = tmp.substring(0, tmp.indexOf("'"));
var roleOrd = (tmp.indexOf("roleOrd") == -1) ? -1 : tmp.substring( tmp.indexOf("roleOrd"), tmp.lastIndexOf("'")).replace("\\x3d", "=");
crmForm.all.IFRAME_view.src = (roleOrd == -1) ? GetFrameSrc(loadArea) : GetFrameSrc(loadArea) + "&" + roleOrd;

}

function GetFrameSrc(tabSet)
{
if (crmForm.ObjectId != null)
{
var id = crmForm.ObjectId;
var type = crmForm.ObjectTypeCode;
var security = crmFormSubmit.crmFormSubmitSecurity.value;
var path = document.location.pathname.substring(0, document.location.pathname.indexOf("edit.aspx")) + "areas.aspx?";

return (path + "oId=" + id + "&oType=" + type + "&security=" + security + "&tabSet=" + tabSet);
}
else
{
return "about:blank";
}
}


Enjoy it! ;-)

29 April 2009

Show both active and inactive records in the lookup view

I had a post about how to return both active and inactive records in the Quick Find View.
People then ask: how to show both active and inactive/deactivated records in the entity's Lookup View?

CRM MVP Batistuta Cai already had a post about a plug-in solution.

If the lookup entity is a system entity, you can also use this technique:

Let's start from an example: you have a custom entity call: MyEntity, you have setup a N:1 relationship between MyEntity and Opportunity, so the user can see an opportunity lookup field on the MyEntity form. Now you want to show users both active and inactive opportunities from that lookup field, all you need to do is put the below code into MyEntity.OnLoad() event:

crmForm.all.new_opportunityid.lookupclass = "alllookups";

The lookup class are controlled via xml files in %ProgramFiles%\Microsoft CRM\Server\ApplicationFiles\
If you take a look at the file: opportunity.xml, you may find a condition like: <condition attribute="statecode" operator="eq" value="0"/>

you can remove the condition, and then use this class, e.g: crmForm.all.new_opportunityid.lookupclass="opportunity"; However it's very much unsupported way(by changing files)! But if you open the file: alllookups.xml, you may find that the opportunity(object type="3") entity doesn't have such condition, so we can use this class to get all opportunities.

09 April 2009

Customizing CRM by Using the Microsoft Dynamics CRM Developer Toolkit

Thanks Microsoft CRM E2 team to provide this useful Toolkit for CRM developers.

To provide developers with the ability to create and manage on-premise CRM solutions in an integrated Visual Studio environment, the Microsoft Dynamics CRM Engineering for Enterprise (CRM E2) team initiated and sponsored the development of the Microsoft Dynamics CRM Developer Toolkit. The toolkit includes two primary components:

The CRM Explorer
The CRM Explorer complements the CRM
Solution Framework, providing the project factories required to open and build
the solution from within Visual Studio. The Explorer manifests as a window
within Visual Studio 2008 and provides direct access to CRM for creating and
editing business units, security roles, and most importantly, entities. The CRM
Explorer is linked to the solution framework which enables it to intelligently
place generated code into the relevant solution framework project.

The CRM Solution Framework
The CRM Solution Framework is a suite of Visual Studio C# projects that are coupled with CRM Entity customizations and wrapped with extensible MSBuild–based developer builds and daily builds. The Framework contains several “pre-canned” projects for the typical tasks that are required of developers when undertaking most Enterprise-level CRM projects. Several of these projects have an inheritance model that affords simple and intuitive augmentation, which can significantly reduce the time required to “jump start” development of new projects.


Software Requirements
Microsoft Dynamics CRM 4.0
Visual Studio 2008 Professional
Visual Studio Team Explorer
StyleCop 4.3 or later (full installation, including MSBuild Integration files)
.NET 3.5 SP1

Installation:
1. Install the CRM Explorer(under folder \CRM Explorer\setup.exe)
2. Install the CRM Solution Framework(under folder \CRMSolutionFrameworkTemplate\Setup.cmd)
Use command prompt to install: Setup.cmd {InstallDir} {ProjectName} {Project Long Name} {Organization Name}

Configuration:
1. Load the project UKDynamics first(Load project normally), then build the solution.
2. Load the project MyCrmSolution(Load project normally), it will referce the UKDynamics class on the step 1. *[1] *[2]
3. From Visual Studio menu bar, click [Tools], then select the [Connect to CRM Server...], give the information then click [OK] button;
4.From Visual Studio menu bar, click [View], then select the [Other Windows]>>[CRM Explorer] *[3]

*[1] If you get warnings like: The referenced component 'UKDynamics.Instrumentation' could not be found. Then you need to re-add the dll reference(UKDynamics.Instrumentation.dll) from UKDynamics\bin folder.

*[2] If you get errors like: The command ""C:\Program Files\Microsoft SDKs\Windows\v6.0A\bin\gacutil" /i "C:\Projects\MyCrmSolution\SourceCode\MyCrmSolution\Core\Configuration\bin\Debug\MyCrmSolution.Core.Configuration.dll" /f" exited with code 1. Configuration
It because all assemblies are delay-signed, you can turn off the strong-name verification on the dev environment by using the SN tool from Visual Studio 2008 Command Prompt: SN.exe -Vr *,*
then run IISRESET.exe

*[3] If you get errors when expand the item, like:
Client found response content type of 'text/html; charset=utf-8, but expected 'text/xml'. HttpException 1310
Exception message: Could not load file or assembly 'MyCrmSolution.Core.BusinessProcesses, Version=1.1.0.0, Culture=neutral, PublicKeyToken=2c1937e0898110b2' or one of its dependencies. Strong name signature could not be verified. The assembly may have been tampered with, or it was delay signed but not fully signed with the correct private key. (Exception from HRESULT: 0x80131045)
It is the same reason and solution with *[2]


Note: The Toolkit is based on components that were initially developed within the Dynamics CRM MCS team in the UK subsidiary. Those components have been refined over a number of UK-based global engagements.

Important: The Microsoft Dynamics CRM Developer Toolkit currently supports customization of on-premise CRM deployments only. This Toolkit and the accompanying documentation are unsupported and are being provided “as is” by the CRM E2 team to assist developers with managing and extending their on-premise Microsoft Dynamics CRM implementations.

27 March 2009

Get Entity/Attribute's Display Name from CRM database


The Display Name for CRM Entity/Attribute is always a special case. In CRM 3.0, the Display Name is saved in the table: OrganizationUIBase, column: FieldXml. To get the Display Name for each attributes isn't an easy job. My approach was transfer the FieldXml column(NVARCHAR) into XML type, then get data from there. Here's the code I'd like to show about how to get the Display Name from CRM 3.0 (I suppose that you only want to see entity Account and Contact):


-- Get the display name from xml field
USE [Contoso_MSCRM]
GO
SELECT CONVERT(XML, REPLACE(CONVERT(NVARCHAR(MAX), O.FieldXml),'' ,'')) AS XmlField
INTO #temp1 FROM OrganizationUIBase O
WHERE NOT EXISTS(SELECT 1 FROM OrganizationUIBase WHERE Version>O.Version AND ObjectTypeCode=O.ObjectTypeCode)
SELECT DISTINCT
t2.x.value('(../../@objecttypecode)[1]','int') AS ObjectTypeCode,
t2.x.value('(../../@name)[1]','nvarchar(100)') AS EntityName,
t2.x.value('@name', 'nvarchar(50)') AS AttributeName,
t2.x.value('(displaynames/displayname/@description)[1]','nvarchar(100)') AS DisplayName
INTO #temp2
FROM #temp1 AS t1 CROSS APPLY t1.XmlField.nodes('/entity/fields/field') AS t2(x)

-- Join the metadata database
USE [Contoso_METABASE]
GO
SELECT
Entity.Name AS EntityName,
Attribute.Name AS AttributeName,
#temp2.DisplayName AS AttributeDisplayName,
FROM Attribute
INNER JOIN Entity ON Attribute.EntityId = Entity.EntityId
INNER JOIN #temp2 ON #temp2.AttributeName = Attribute.Name AND #temp2.ObjectTypeCode = Entity.ObjectTypeCode
WHERE EntityName IN ('Account', 'Contact')
ORDER BY EntityName, AttributeName

DROP TABLE #temp1
DROP TABLE #temp2


In CRM 4.0, because it supports multi languages, so the database has been re-designed: the FieldXml field has been abandoned. Instead, Microsoft uses a new table: LocalizedLabelView to save the Entity/Attribute's Display Name, it's much easy to get the Display Name, same example here (English version, the LanguageId is 1033):


USE Contoso_MSCRM
GO

SELECT EntityView.Name AS EntityName, LocalizedLabelView_1.Label AS EntityDisplayName,
AttributeView.Name AS AttributeName, LocalizedLabelView_2.Label AS AttributeDisplayName
FROM LocalizedLabelView AS LocalizedLabelView_2 INNER JOIN
AttributeView ON LocalizedLabelView_2.ObjectId = AttributeView.AttributeId RIGHT OUTER JOIN
EntityView INNER JOIN
LocalizedLabelView AS LocalizedLabelView_1 ON EntityView.EntityId = LocalizedLabelView_1.ObjectId ON
AttributeView.EntityId = EntityView.EntityId
WHERE LocalizedLabelView_1.ObjectColumnName = 'LocalizedName'
AND LocalizedLabelView_2.ObjectColumnName = 'DisplayName'
AND LocalizedLabelView_1.LanguageId = '1033'
AND LocalizedLabelView_2.LanguageId = '1033'
AND EntityView.Name IN ('Account','Contact')
ORDER BY EntityName, AttributeName

21 March 2009

Introduce a Data Audit solution for Microsoft Dynamics CRM

I'm pleased to introduce a Data Audit solution for Microsoft Dynamics CRM:

What it does?
Data Audit add-on can record the fact: Who did What at When. For example: you want to audit changes for the field: Account.EmailAddress1, all you need to do is just 3 clicks! The add-on will record the entity name, audit field, record id, original data, modified data, modified time, modified by information. Those audit histories for this record will associate with the record(for applicable entities), furthermore, you can also see all audit histories in one place.

What it is?
It is an ISV solution to integrate to Microsoft Dynamics CRM seamlessly, with same interface and user experience.

What does it support?
Data Audit 1.0 supports both On-Premise and IFD deployment, Stand-Along and Web-Cluster server structure, and Multi-Tenants. It supports both system entity/attribute and custom entity/attribute.
* The 1.0 version of Data Audit supports 32bit English Version Microsoft Dynamics CRM 4.0.

How it works?
See this 2 minutes demo video:


Please email us to get an evaluation license(30 days full function).

MVP Summit 2009 @ Seattle - Meet the CRM MVPs

It's a great summit and nice to meet CRM team and MVPs.


Meet the famous CRM authors: Jim Steger and Mike Snyder


MVP Darren Liu and me eatting the Red King Crab...


Jim Wang with the coffee which made by the world's first Starbucks @ Seattle, US


Jim Wang with his baby Niu

25 January 2009

Happy Chinese New Year! 2009 - The Year of The Ox


My dear friends, happy Chinese New Year! 2009 - The Year of The Ox ('牛'), and hopefully it could help the economics!!! ;-)

Cheers,
Jim

16 January 2009

CRM 4.0: Checkbox style Multi-Select Picklist

CRM 4.0 doesn't have many out-of-box user controls, e.g: a mulit-select picklist. The standard CRM picklist can only save one value in the database, it's not easy to extend this functionality, in addition, you have to deal with the Advanced Find feature.

You can make a picklist multi-selectable by enable the picklist mulitple attribute , e.g: crmForm.all.new_picklist.multiple = true; And then save the selected values somewhere else. However, it does not very impressive the user because the user has to use the CTRL key to select options, which is not user-friendly (Thanks for Alastair Westland (PM @ Parity) who work with me to improve the interface design:)

The script below will draw a checkbox style mulit-select picklist control on the CRM form, and then get options from the real picklist attribute. So how to use it?

1. Create a standard picklist attribute with all options in CRM, put it on the CRM Form. e.g: new_picklist;
2. Create another nvarchar attribute in CRM to save the selected text, put it on the CRM Form and hide the label. e.g: new_picklistvalue;
3. Put the following script in the Form.OnLoad() event.

*NOTE: There is a 'br' flag(var addBr = document.createElement(...) ) just been ignord by blogspot, please replace it when you paste the code!!!


/*
Checkbox style Multi-Select Picklist
author: Jim Wang @ January 2009
http://jianwang.blogspot.com
*/

// PL - the picklist attribute; PLV - used to save selected picklist values
var PL = crmForm.all.new_picklist;
var PLV = crmForm.all.new_picklistvalue;

if( PL != null && PLV != null )
{
PL.style.display = "none";
PLV.style.display = "none";

// Create a DIV container
var addDiv = document.createElement("<div style='overflow-y:auto; height:80px; border:1px #6699cc solid; background-color:#ffffff;' />");
PL.parentNode.appendChild(addDiv);

// Initialise checkbox controls
for( var i = 1; i < PL.options.length; i++ )
{
var pOption = PL.options[i];
if( !IsChecked( pOption.text ) )
var addInput = document.createElement("<input type='checkbox' style='border:none; width:25px; align:left;' />" );
else
var addInput = document.createElement("<input type='checkbox' checked='checked' style='border:none; width:25px; align:left;' />" );

var addLabel = document.createElement( "<label />");
addLabel.innerText = pOption.text;

var addBr = document.createElement( "<br />"); //it's a 'br' flag

PL.nextSibling.appendChild(addInput);
PL.nextSibling.appendChild(addLabel);
PL.nextSibling.appendChild(addBr);
}

// Check if it is selected
function IsChecked( pText )
{
if(PLV.value != "")
{
var PLVT = PLV.value.split("||");
for( var i = 0; i < PLVT.length; i++ )
{
if( PLVT[i] == pText )
return true;
}
}
return false;
}

// Save the selected text, this filed can also be used in Advanced Find
crmForm.attachEvent( "onsave" , OnSave);
function OnSave()
{
PLV.value = "";
var getInput = PL.nextSibling.getElementsByTagName("input");

for( var i = 0; i < getInput.length; i++ )
{
if( getInput[i].checked)
{
PLV.value += getInput[i].nextSibling.innerText + "||";
}
}
}
}


Note: Please be aware of this is an unsupported customization.

11 January 2009

CRM 4.0 External Connector License

It's very common to extend CRM to external users, however I saw many customers ask if they need license to do something. A External Connector License is used on:

Available for
• Professional Server
• Enterprise Server
Access License only – no additional software/licenses included
Extends access to external users (e.g. Partners, Customers, Suppliers)
Scenarios*

• Create new activities in CRM, such as a case via a portal
• Update information in CRM, such as contact information via a portal
• Fill orders, or update case status via a portal
* Access via Dynamics CRM Client technology requires a CAL


According to the Microsoft Dynamics® CRM 4.0 Licensing & Pricing Guide

The Microsoft Dynamics CRM 4.0 External Connector enables customers to extend Microsoft Dynamics CRM to their external users such as customers, partners, suppliers, and end users who access a copy of the server software (for which a license was acquired), through any application/graphical user interface (GUI), other than the Microsoft Dynamics CRM client. “External Users” are users who are not either (i) your or your affiliates’ employees, or (ii) your or your affiliates’ onsite contractors or agents, External users also does not include hosted-software service users, such as those already licensing via the Microsoft Service Provider License (SPLA).

An External Connector must be purchased for each server that hosts an application that provides external access to Microsoft Dynamics CRM 4.0 data as described above. External users should not be using the Microsoft Dynamics CRM 4.0 applications & GUIs directly. The alternative is for every external user to acquire a CAL

For the Microsoft Dynamics CRM Professional Server and Enterprise Server, there are 3 External Connector functionalities:

External Connector – The full use External Connector provides external users with full read-write access to Microsoft Dynamics CRM 4.0 data, such as that provided through any application/graphical user interface. The Full Use External Connector will appear on price lists as the Dyn CRM Extrnl Con, and consists of both the Limited External Connector and the Full Use Additive External Connector combined to provide full use capability.

Limited External Connector – The Limited External Connector provides external users with read-only access to Microsoft Dynamics CRM 4.0 data, such as described above. The Limited External Connector will appear on the price lists as the Dyn CRM Ltd Extrnl Con.

Full Use Additive External Connector – The Full Use Additive External Connector provides external users with write-access to Microsoft Dynamics CRM 4.0 data such as described above, and may only be purchased to supplement a Limited External Connector with write-access capability. The Full Use Additive External connector will appear on price lists as the Dyn CRM Additve ExtrnlCon.


External Connectors and Limited External Connectors may be mixed within an environment.

The number of Full Use Additive External Connectors may never exceed the total number of Limited External Connectors used within an organization.

An External Connector is a license only, and does not include any physical software components, and does not include licensing for any other Microsoft products. If external scenarios integrate with Microsoft SQL Server, Microsoft Office SharePoint or any other product license rights for these must be established separately.

For more information on Microsoft Dynamics CRM 4.0 Use Rights under Volume Licensing: http://www.microsoftvolumelicensing.com/userights/

Partners and Customers should work with their Microsoft Licensing Specialist or local Microsoft Representative to ensure their licensing compliance.