15 August 2009

Build a handy Dynamics CRM development environment

Last month, Sonoma Partners and Microsoft had an very useful article for CRM developers: Setting Up Your Development Environment, I have abstract it into Chinese version. In this post, I'd like to give my idea about how to build up a handy Dynamics CRM development environment.

The typical situation is: A CRM developer runs a Virtual PC image on his/her own PC; the virtual image is a All-In-One CRM system(Windows Server/SQL/IIS/CRM/SharePoint etc.); the Host PC has Visual Studio installed. I'm not going to discuss the mutli-developers sharing one development environment using TFS in this article.

Setup Virtual PC environment:
Microsoft Virtual PC is a free software, it has all we need to host a development environment. You may firstly install Windows Server 2003/2008 on the VPC, then install AD, DNS, IIS 6/7, SQL server 2005/2008, CRM 4, etc. Finally it's a All-In-One CRM box, I'd like to point out that:

1. It can be a Domain Controller - that's for your development only, not for production.

2. You may need 3 Network Adapters in the VPC:
a. Local only - for VPC internal use
b. Microsoft Loopback Adapter - for the communication between Host and VPC
c. Host's Physical Adapter - for the Internet access via the Host PC

The communication between Host and VPC can be used by a Physical Adapter, however think about this situation:
You have a laptop which can be used at home(via Wireless) and company(via Cable), so the IP arrange / Adapter are different.
That's the reason why we need a Microsoft Loopback Adapter in this "handy" environment(BING it: how to set up a Microsoft Loopback Adapter).

3. The VPC can be set up to the On-Premise/IFD mode, so you can develop/test both CRM deployment. You may edit Host's hosts file(e.g.: C:\WINDOWS\system32\drivers\etc\hosts) to point to the IFD URL.


Setup Visual Studio on the Host PC:
You can use Visual Studio to develop/debug CRM on the Host PC, to make it work efficiently:

1. Add user credentials to access VPC (on your Host PC(I suppose it's a Windows XP system, Vista/7 are similar), go to: Control Panel>>User Accounts>>Advanced>>Manage Passwords) , then type in VPC's Server name, User name and Password, click OK to save it.


2. To make the Remote Debug work, the runas account for Visual Studio on the Host PC and the runas account for the Visual Studio Remote Debugging Monitor(msvsmon.exe) on the VPC must use the same user name, it doesn't matter whether users are in two different domains. For example, your VPC domain name call: WIN2K3, your logon user for the VPC is Administrator; However your Host PC's logon user is: CompanyDomain\jimwang, in this case, the remote debugging will not work because it's on different users names. What you can do is, use the local Administrator account on your Host PC to run Visual Studio. E.g.: you can simply create a shortcut on your desktop, target to, e.g.: %windir%\system32\RUNAS.exe /USER:HostPCName\Administrator "C:\Program Files\Microsoft Visual Studio 9.0\Common7\IDE\devenv.exe" . These two users must have the same password as well.

3. How to remote debug VPC CRM from the Host PC?
Once you completed the step1 and step2, then make sure the msvsmon.exe is running on the VPC( you can copy the file from your Host PC: C:\Program Files\Microsoft Visual Studio 9.0\Common7\IDE\Remote Debugger\x86\), the monitor will then waiting for new connections. Go back to your Host PC, set a Breakpoint in your project,
Then click "Debug">>"Attach to process...", in the Qualifier, type in the VPC's server information you created on step 1, e.g.: WIN2K3\Administrator@R2
And then attach w3wp.exe (Managed code).


4. How to deploy the plugins .dll file to VPC?
You need to deploy the .dll file to the VPC's file system in order to Remote Debug(see SDK for more information), the folder is, e.g.: C:\Program Files\Microsoft Dynamics CRM\Server\bin\assembly\
You may share the folder and give permission to everyone with full control, then in the Visual Studio, set up the project output path to the shared folder, e.g.: \\R2\assembly\
Now, you may have the experience that, every time you deploy/debug the project, you have to run a IISRESET on the VPC to release the previous .dll file.
I write a Windows PowerShell script to help you do the hard work, your may save it as RecycleCRMAppPool.ps1, then in Visual Studio, make it as the Pre-build event command line of the project. The script will recycle the CRMAppPool before deploy the .dll file.


$server="R2";

$co = new-object System.Management.ConnectionOptions;
$co.Authentication=[System.Management.AuthenticationLevel]::PacketPrivacy;
$co.EnablePrivileges=$true;

$wmi = [WmiSearcher] "Select * From IIsApplicationPool";
$wmi.Scope.Path = "\\$server\root\microsoftiisv2";
$wmi.Scope.Options=$co;

foreach($crmpool in $wmi.Get())
{
if($crmpool.name -eq "W3SVC/AppPools/CRMAppPool")
{
$crmpool.recycle();
}
}


5. You may also use Microsoft Dynamics CRM Develop Toolkit Visual Studio add-on to develop any plugin/workflow assembly/jscript for your CRM project, it will reduce your development time.
04 August 2009

CRM Filtered Lookup Multi

I had some posts last year about the CRM Filtered Lookup, these technique are broadly used in the CRM community.

The mysterious CRM Lookup (I)
The mysterious CRM Lookup (II)
The mysterious CRM Lookup (III)

A few days ago, I saw a post on the Microsoft Dynamics CRM Chinese Forum about how to add filter to LookupMulti.aspx ?
I think it's a very common requirements, so I'd like to give my idea.
When I start with this customization, my bottom line was: Not change any files/databases. However this customization should be marked as a "unsupported customization" (call CRM/JS function directly).


OK, the question was:
A customized entity: ShippingMark (new_shippingmark), it has N:1 relationship with Account; it also has N:N relationship with Quote.
And as we known by default, Quote has N:1 relationship with Account(via customerid)

So the relationship is simple: Account -< (customerid)Quote >< ShippingMark(new_accountid) >- Account

What the user wants was classic: Open a Quote record, then go to Add Existing ShippingMark, then in the LookupMulti page, only return the ShippingMark which has the same Account(new_account) with Quote's(customerid).

There are two parts of the code: server side Plugin.Execute event and client side CRM.Onload event. What the client side code does is: create a custom lookup window, and pass the customerid as a parameter, so the lookup URL looks like: …&id=…, then the server side plugin will replace the FilterXml query string based on the parameter.

I give the code prototype for this specific requirement, you need to modify it for re-use. This technique should work for both LookupSingle.aspx and LookupMulti.aspx.


1. Plug-Ins
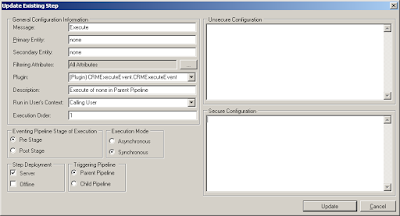
Register the Execute message on the Pre Stage/Synchronous/Server/Parent Pipeline.


/*
* Microsoft Dynamics CRM Lookup Filter
* Plug-Ins: Execute message on the Pre Stage/Synchronous/Server/Parent Pipeline.
* Jim Wang @ Aug 2009, http://jianwang.blogspot.com, http://mscrm.cn
*
*/

using System;
using System.Collections.Generic;
using System.Linq;
using System.Text;
using System.IO;
using System.Web;
using Microsoft.Crm.Sdk;

namespace CRMExecuteEvent
{
public class CRMExecuteEvent : IPlugin
{
string lookupId;

public void Execute(IPluginExecutionContext context)
{

lookupId = HttpContext.Current.Request.QueryString["id"] == null ? null : HttpContext.Current.Request.QueryString["id"].ToString();

if (lookupId == null) return;

try
{
if (context.InputParameters.Contains("FetchXml"))
{
string beforeXml = (String)context.InputParameters["FetchXml"];

if (beforeXml.Contains("<entity name=\"new_shippingmark\">") && beforeXml.Contains("xml-platform"))
{
//Customise the FetchXml query string
string afterXml =
"<fetch version='1.0' page='1' count='100' output-format='xml-platform' mapping='logical'> " +
"<entity name='new_shippingmark'> " +
"<attribute name='new_shippingmarkid' /> " +
"<attribute name='new_name' /> " +
"<attribute name='createdon' /> " +
"<order attribute='new_name' /> " +
"<link-entity name='quote' to='new_accountid' from='customerid'> " +
"<filter type='and'> " +
"<condition attribute = 'customerid' operator='eq' value='" + lookupId + "'/> " +
"</filter> " +
"</link-entity> " +
"<filter type='and'> " +
"<condition attribute='statecode' operator='eq' value='0' /> " +
"<condition attribute='new_name' operator='like' value='%' /> " +
"</filter> " +
"</entity> " +
"</fetch>";

//Replace the FetchXml query string
context.InputParameters["FetchXml"] = beforeXml.Replace(beforeXml, afterXml);

}
}
}

catch (System.Web.Services.Protocols.SoapException ex)
{
throw new InvalidPluginExecutionException("An error occurred in the CRM plug-in.", ex);
}
}

}
}


2. Quote.OnLoad()


var relId = "new_new_shippingmark_quote";
var lookupId = crmForm.all.customerid;

var lookupEntityTypeCode;
var navId = document.getElementById("nav" + relId);
if (navId != null)
{
var la = navId.onclick.toString();
la = la.substring(la.indexOf("loadArea"), la.indexOf(";"));

navId.onclick = function()
{
eval(la);

var areaId = document.getElementById("area" + relId + "Frame");
if(areaId != null)
{
areaId.onreadystatechange = function()
{
if (areaId.readyState == "complete")
{
var frame = frames[window.event.srcElement.id];
var li = frame.document.getElementsByTagName("li");

for (var i = 0; i < li.length; i++)
{
var action = li[i].getAttribute("action");
if(action != null && action.indexOf(relId) > 1)
{
lookupEntityTypeCode = action.substring(action.indexOf("\(")+1, action.indexOf(","));
li[i].onclick = CustomLookup;
break;
}
}
}
}
}
}
}

function CustomLookup()
{
var lookupSrc = "/" + ORG_UNIQUE_NAME + "/_controls/lookup/lookupmulti.aspx?class=&objecttypes=" + lookupEntityTypeCode + "&browse=0";
if(lookupId != null && lookupId.DataValue != null && lookupId.DataValue[0] != null)
{
lookupSrc = lookupSrc + "&id=" + lookupId.DataValue[0].id;
}

var lookupItems = window.showModalDialog(lookupSrc, null);
if (lookupItems) // This is the CRM internal JS funciton on \_static\_grid\action.js
{
if ( lookupItems.items.length > 0 )
{
AssociateObjects( crmFormSubmit.crmFormSubmitObjectType.value, crmFormSubmit.crmFormSubmitId.value, lookupEntityTypeCode, lookupItems, true, null, relId);
}
}
}